Tracking Image Settings

Add Tracking Image
Enables you to add an image from C:\CS\Shared\Image (default path).
A wide variety of formats are supported. However, gif images are preferred because they support transarency and are reasonably small.
By default the file display filter is set to "All files *.*"
If a file type is not supported or corrupt or missing a "Unable to load image file" message will appear in the messages area. And the default "safe" red square mode will be implemented (see below).
WARNING: Very large image files will take time to load and may slow the system down.
NB: If an image can't be loaded for any reason (eg missing file) the system will auto reset into "red square" mode. In this mode any current images will be set against a red square background and if no image is currently loaded a simple red square will be displayed. To reset this mode add a valid image file, save, exit the application and then restart the application.
NB New images will be resized automatically in accordance with your current tracking object size settings. To crop an existing image edit using appropriate software eg Photoshop.
Image Size
This track bar enables you to proportionally increase or decrease the size of the image in both dimensions (width and height) or in one dimension (eg width only).
NB All images are treated initially when first loaded as being square. To alter the proportions of an existing image edit using appropriate software or use the "Width / Height" functions below.
Width / Height
These track bars enable you to increase or decrease the width or height of the image.
Multiple Tracking Images (New in V2.9.3a)
This feature allows many tracking images to be displayed in sequence. The image is changed when the loop counter is incremented. In most cases this will be when the tracking object / image is at the right hand side.
To load multiple tracking images:
- click on the "Tracking image" button
- hold the control or shift keys down at the same time as selecting image files
The control key allows you select files individually. The shift key allows you to select blocks of image files.
If one or more of the selected files is not valid it will be skipped and an error message will be displayed. The remaining files will be displayed when tracking. The same is true when loading a saved settings file eg if an image file has been deleted since the settings were last used.
In theory there is no limit to the number of images that you can load. The only limits are those imposed by the amount of available memory and processor speed.
You may select background images one by one or in bulk from any number of different folders. To select files from different folders simply click the "Open" button after selecting files from the first folder, then click on the "Tracking image" button again and so the same for the tracking images in the second folder.
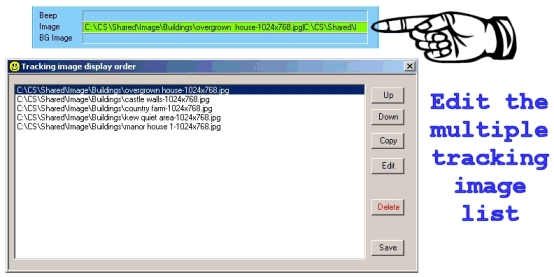
You can also edit multiple tracking images - this means that you can change the display order and copy / delete images from the list of images to display. To edit the list of images to display:
- click on the edit icon that will appear to the right of the "Add..." button OR
- click on the file location text to the right of "BG Image" in the "File locations" panel
Click on the "Clear" button at the bottom of the "Image" panel to remove all tracking images and start-over.
System Images
These are contained within c:\CS\vEMDR\Image\System and should not be altered / deleted.
Subliminal Suggestion text entry box
Any text entered into this box will be displayed as a rapid subliminal message when the ball / image is at the far left or right hand sides. Space is available for a small, direct message only. To prevent subliminal messages from being displayed simply remove the text from the box. Subliminal messages are saved with the settings profile and are automatically converted to uppercase only. The message will use approx 80% of the available screen area - the font size will increase / decrease accordingly as you enter text.
When you have completed editing click just outside of the text entry area.
 Background Image and Settings Background Image and Settings
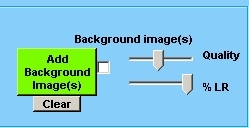
Quality (of background image) trackbar
The level of automatic compression applied to the currently selected background image. 100 (fully right) = load file "as is". 20 (fully left) is 80% compressed. Tracking speed will vary depending on the quality level selected.
Add Background Image
Browse your PC for a suitable image file.
The default path will be C:\CS\Shared\Image.
Background images are displayed behind tracking objects and the video window. Most common image file formats are supported.
Optionally the image can be displayed only when the tracking object is at the far left or right-hand sides of the screen (See BG Img % LR below).
Add Background Image - Check-box
If you check the check-box the system will attempt to estimate any required changes to speed to compensate for large background files being in memory / generating more processor activity.
Multiple Background Images (New in V2.9.4+)
This feature allows many background images to be displayed in sequence. The image is changed when the loop counter is incremented. In most cases this will be when the tracking object / image is at the right hand side.
To load multiple images:
- click on the "Add BG" button
- hold the control or shift keys down at the same time as selecting image files
The control key allows you select files individually. The shift key allows you to select blocks of image files.
The files will be load into memory in accordance with the "Quality" setting. If the quality is set to 100% the file is not loaded into memory, it is read from disk "as-is" without any form of compression. If the files are of differing sizes tracking speed may vary between files.
If the quality is anything other than 100% and images are of differing sizes tracking speed will not vary between different backgrounds.
If one or more of the selected background files is not valid it will be skipped and an error message will be displayed. The remaining files will be displayed. The same is true when loading a saved settings file eg if an image file has been deleted since the settings were last used.
After loading multiple background images you can change the "Quality" setting. The changed quality level will be reflected in all of the loaded background images.
In theory there is no limit to the number of images that you can load. The only limits are those imposed by the amount of available memory and processor speed.
As of version 3.3 you can select background images one by one or in bulk from any number of different folders. Previously multiple background images for the slideshow effect had to be selected in from one folder and all at the same time.
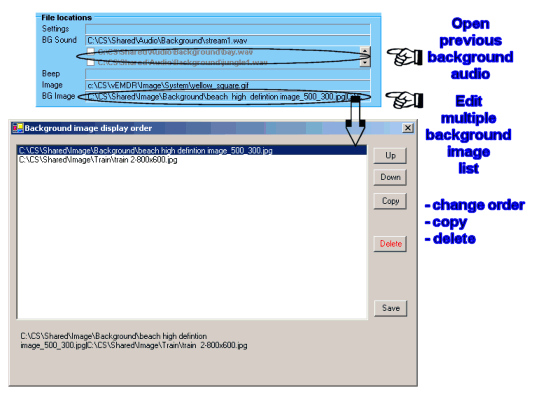
You can also edit multiple background images - this means that you can change the display order and copy / delete images from the list of images to display. To edit the list of images to display:
- click on the edit icon that will appear to the right of the "Add..." button OR
- click on the file location text to the right of "BG Image" in the "File locations" panel
Click on the "Clear BG" button at the bottom of the "Image" panel to remove all background images and start-over.
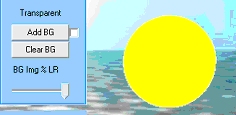
Opaque / Transparent
This indicates if transparency has been enabled for the currently selected tracking object against a single colour background or currently selected background image if "BG Img % LR" is anything other than 0. Click on the text to change the setting.
It is recommended that you avoid enabling transparency when using background images unless you have a very fast system.
Transparency enabled
Transparency disabled
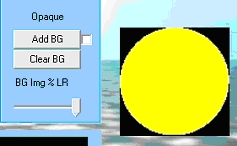
Clear BG
Remove the currently selected background image
Background Image Image % LR
Alters the amount of time that the background image is displayed for example:�
- 100% = display all of the time�
- 10% = display only when 10% of the screen from the left or right hand sides.
- 0% = display all of the time but disable transparency even if transparency has been enabled
View / Compress Background Image - New to version 2.8.9 June 07
Note: In effect this option has been superseded by the "Quality" option in EMDR Pro 2.9+.
This feature is available via the top menu. Having selected a background image that is in jpg format click on:
- "Image" then
- "Compress Background Image"
What happens? The current background image will be copied to the same folder with "_500_300" added to the end of the file name. The new image is then resized to 500 by 300 pixels and the quality is standardised. The new file is then loaded into EMDR Pro as the current background image.
This process results in a very small background image file that is ideal for use when selecting in "transparent" mode. You may notice that the speed is too fast after compressing the background image and you may notice slightly less sharpness.
© Neuro Innovations 2002-2010
|