EMDR Pro for PCs Support Resources
FAQ's and resourcesHow to unlock EMDR Pro in detailClick here for step by step instructions with diagrams (PDF format 200K) After installing: If you are connected to the Internet
If you are NOT connected to the Internet
You will receive an unlock eMail that will contain details of all products registered to you that will also include download details. If you have already downloaded the installation file or have an installation CD you don't need to do so again. The redownload details are provided to enable you can upgrade to the latest version if there has been a version change since you originally downloaded or installed from CD. Then do the following: Select the unlock code text by:
If the process worked you will be told that the software is unlocked
The text at the top of the screen should say "EMDR Pro registered version".
How do I get a new unlock codeThe best way is to download the latest version and click on Help / Unlock when connected to the web.
How do I upgrade to the latest versionAutoupdate is the easiest way to ensure that you have the latest version. To check to see if you have the latest version from within EMDR Pro click on "Help" then "Check for updates". Refer to your original download eMail for download instructions if you need to upgrade. If Autoupdate is installed and there is a new version Autoupdate will be automatically run. NB When deinstalling / reinstalling any files that you added and your user profiles (settings) will not be removed. Assuming you have already installed the following apporach allows you to reinstall the previous version should you so desire (not that you will want or need to!):
Is the user manual available for printing?
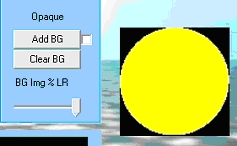
Multiple backgrounds - the slideshow effectThe slideshow background effect is a new feature in V2.9.5+ and replaces the previous approach of using very large animated gif files which tended to slow tracking down considerably. When the quality setting is at 100% the background files are displayed "as is" without any form of compression or standardisation. You need to do this if you wish to display an animated gif file. If you don't set the quality to 100% the auto compression facility will compact the animated gif file into a single image. The disadvantage of loading files "as is" is that they will be of differing sizes and qualities. This means that it can be difficult to maintain a constant tracking rate. In most cases you can keep the quality level to the default (about 50%) which means that all files are automatically compressed by 50% and made the same size. This is all done in memory so does not affect your original files at all. Tracking then remains totally constant regardless of the size or quality of the original files. If your original files are very small or already highly compressed then you should consider increasing the quality setting to a higher value. When you change the quality setting you will see the effect instantly applied to the current background image. Corrupted or missing files are simply skipped when the files are initially loaded. You can now select background images one by one or in bulk from any number of different folders. Previously multiple background images for the slideshow effect had to be selected in from one folder and all at the same time. (Version 3.3+) You can also now edit multiple background images - this means that you can change the display order and copy / delete images from the list of images to display. Overall you now have compete control over the display of multiple background images. To edit the list of images to display simply click on the file location text to the right of "BG Image" in the "File locations" panel. Click on the "Clear BG" button at the bottom of the "Image" panel to remove all background images and start-over. (Version 3.3+) Click here to see how...
Multiple tracking images - the tracking image slideshow effectThis feature is more or less as per the slideshow effect for background images and was released to non-test users in Version 4.3. To select multiple tracking images click on the "Tracking Image" button and select multiple files whilst holding the shift key down. It does not matter whether the images are large or small - they are automatically resized in memory when selected. There is no change to the size of the image on your hard-drive.
Automatic relocation of moved or renamed shared media filesIf a media file was missing in the past an information message would have been displayed when opening saved settings files. As of V3.3 if a media file is missing (that was in the shared multimedia library or in any of the other default media file locations used in previous versions of EMDR Pro) EMDR Pro will try and find a file by the same name or a very similar name in the shared multimedia library. This means that folder names and file names can change slightly and the media file will be automatically relocated when opening saved settings files. If the filename changes too much the file will not be relocated. (Multiple background images are excluded from this because this area of the program has its own way of dealing with missing or corrupted images. This may change in later versions).
Are the keyboard shortcuts available for printing?How do I install the new manual without needing to redownload the installation file?The user manual within EMDR Pro has now been rewritten and updated to include all V2.8 features. Click here to preview. Updates to V2.8.7 have been documented. How do I enable transparency?
NB Enabling transparency adds a significant overhead to the work that your processor has to do in order to generate smooth movement hence it is advised that you only enable tranparency if you have a fast system. If movement becomes slow or jerky or there is too much sound from your laptop's cooling fan then don't enable tranparency. NB When you first load a background image tranparency is automatically disabled for the benefit of the majority of users. This is the difference between transparency being enabled V disabled.
Not all images are capable of supporting transparency eg JPG does not, GIF does but only if a transparency colour has been set. Transparent images will typically have a neutral background colour such as white. The following webpage tells ypou how to enable transparency in a gif file with Paint Shop Pro More...
Where's the user multi-media library?This is available only on the installation CD. Click here to create the same folder stucture of your hard drive. This is the DOS code that is run:
The above folder structure is automatically setup with later versions of EMDR Pro.
How do I use the multi-media libraryV2.4/2.6 Click here for detailed instructions for versions 2.4/2.6. V2.8+ In version 2.8+ the presence of the shared library is automatically detected and the default paths are adjusted accordingly. To disable this uncheck the checkbox in the options window.
Where did my beeps and images go?In the first version of version 3.0 only the installer seemed to be skipping the creation of the folder that contains beeps / images and video files. We have now corrected the problem in the installer. If you deinstall ("Start" then "Add/remove programs"), redownload and reinstall the beeps and images will reappear. You do not need to re-enter your unlock code. To correct the problem yourself if you so desire you can do the following: Create a new folder called C:\CS\Shared Move C:\CS\Audio C:\CS\Image and C:\CS\Video into C:\CS\Shared. The above issue is not present in the current version of the Version 3.0 installer.
How do I use my PC as an amplifierI want to use headphones for my client but want my voice to come through as well. How do I do this? Full instructions are given here
How do I record using Audacity?Full instructions are given here and here If your sound card does not have a "Stereo Mix" "What you can hear" capability but does have a "Mic / Line In" socket then you can use a very cheap 3.5 mm male to male cable to feed headphone output into your line-in socket. You then select "Mic / Line In" as the source to record from. No bilateral sounds with (some) headsetsSome headphones contain stereo splitting circuits that will effectively prevent bilateral sounds from being generated. A stereo splitter circuit forces sound to both ear pieces and changes the volume levels between the two sides. As a result bilateral sounds will be heard in both ears. Also, some sound cards activate a "Stereo Virtualisation" filter when they detect that headphones are plugged in. This filter has the same effect as a stereo splitter circuit. If affected you should use a different type of headset and or disable "Stereo Virtualisation" and "Virtual Surround" options (see below): Clcik here for detailed instructions to try to resolve... Additionally on some systems with some headsets it may not be possible to bilaterally pan mono files using the background sound player. The large media player should be used instead.
More resources / FAQ's are available here Contact us via info@neuroinnovations.com
Home
|
Shop
|
Contact us
|
Therapists Toolkit
|
EMDR Software
|
EMDR Lite Software
|
Phobia Treatment Software
|
Aversion Software
|
TFT Software
|
Flooding Desensitisation / Implosion Therapy Software
|
Emetophobia Desensitization Multimedia Software
|
Desensitisation Therapy Multimedia
|
NLP Swish technique mood / state change software
|
Bilateral Audio Software
|
Drug / alcohol / food (cake / chocolate) aversion software
|
CBT / CBH Tasking Software
|
Directory / Resources |
Sitemap
EMDR, Hypnotherapy and Hypnosis in High Wycombe and Central London |
() |
Psychotherapy, hypnotherapy and hypnosis in High Wycombe
Last Updated 13 July 2026 © www.neuroinnovations.com 1998-2023
|
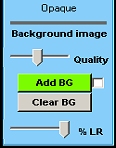 In the image menu part of the GUI click on the word "Opaque" and it will will change to read "Transparent". If you have a background image loaded alter the % visible to anything other than 0%. (0% automatically disables transparency for the benefit of the majority of users).